Thursday, December 8, 2016

Developing a simple address book using PHP, MySQL

NOTE: this tutorial assumes that you have already went through and read Installing, Configuring, and Developing PHP on Localhost with XAMPP.

Now that we have run and tested Apache and PHP, the next step is running MySQL and creating a database and table which will hold information for our address book program. Through the XAMPP control panel start up Apache and MySQL. Then navigate to localhost/phpmyadmin and you shall see the phpMyAdmin interface.


  • Creating the database: The first step with phpMyAdmin running is creating a new database. To do this, click on databases from the menu, point to the textbox labelled Create new database and type addressBook as the name of a new database. Click create. Next you will be prompted to create a new table, go ahead and create the table friends with 3 columns having the following stucture:


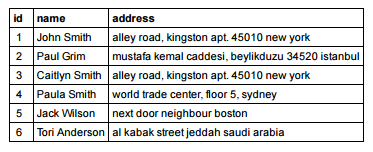
  • Inserting new records: Following the creation of the friends table, you will be required to insert the columns that make up your table. You can either use phpMyAdmin's Insert interface which is easy or just use normal SQL queries. Here are some random inserted values that I am gonna use for this tutorial:

  • Writing the PHP script: We are now ready to write the PHP program that will connect to the database and display our data in an internet browser. The procedure that we will write this program is to first establish a connection with the database using PHP, then start our XHTML deceleration and meta data, and finally in the body of our page, write a loop that will iterate through each record in the colleague table and display that data in the browser. Here's the PHP script, save it as index.php in a folder named addressBook:
 
<!DOCTYPE html PUBLIC "-//W3C//DTD XHTML 1.0 Transitional//EN" "http://www.w3.org/TR/xhtml1/DTD/xhtml1-transitional.dtd">
<html xmlns="http://www.w3.org/1999/xhtml">
 <head>
  <title>Address Book - Krypto Tek XAMPP Example</title>
 </head>
 <body>
 <?php
  //setting db details:
  $servername = "localhost";
  $username = "root";
  $password = "";
  $dbname = "addressBook";
  //establish a connection:
  $connection = new mysqli($servername, $username, $password, $dbname);
  //run a query and store results in variable $result:
  $result = $connection->query("SELECT * FROM friends");
 ?>
  <!-- We will make a table and display the values from our database in it-->
  <table border="1" cellpadding="2" cellspacing="3">
   <tr>
    <th>ID</th>
    <th>Name Surname</th>
    <th>Address</th>
   </tr>
   <?php
    //check if our query returned any values:
    if($result->num_rows > 0)
    {
     //loop through all the values fetched from $result and print them out as table rows:
     while($row = $result->fetch_assoc())
     {
      echo "<tr>";
      echo "<td>".$row['id']."</td>";
      echo "<td>".$row['name']."</td>";
      echo "<td>".$row['address']."</td>";
      echo "</tr>";
     }
    }
   ?>
  </table>
 </body>
</html>


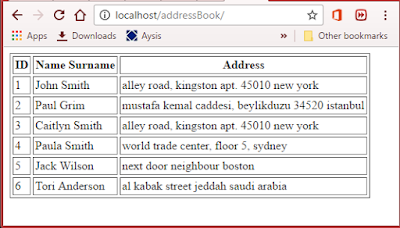
  • Checking the results: Making sure that the Apache, along with MySQL are running, open up an instance of your internet browser and type in the location of your address book PHP file. For example, if you created an addressBook folder inside the htdocs folder, then the path to run the address book program would be: http://localhost/addressBook/index.php. If done correctly, you will be presented with a page similar to the following:


Although these concepts are important ones, they are in no means the end of an application. By using the address book program as an example, there is still a lot of features that can be implemented in such an application. Features such as editing contact information, deleting contacts, adding new contacts through a form are all additions that can be implemented to the example used in this article. Challenge yourself, use this article and other resources as a jump-start and try adding other capabilities to your own address book program! And if you had any questions be sure to use the comments section below. 
Continue Reading...

Wednesday, December 7, 2016

Installing, Configuring, and Developing PHP on Localhost with XAMPP


This article explains the installation and configuration process of the XAMPP Apache distribution. First of all grab a copy of XAMPP installer by clicking here and picking your operating system.

NOTE: this tutorial is intended for windows users, 'Linux' and 'Mac' should have a very similar procedure though.

Installation Requirements:
    XAMPP is a small and light Apache distribution containing the most common web development technologies in a single package making it the ideal tool for beginners developing and testing applications in PHP and MySQL.

  • approximately 17 MB for the self-extracting ZIP
  • at least 118 MB after it has been extracted
Once downloaded, run the installer and follow through the instructions.

NOTE: if you get a warning regarding user account control, ignore it. Press 'OK' and continue ahead to installation making sure that you do not set the installation directory to windows system folders that would need write permissions.


when prompted for component selection, it is recommended to select all. Although for now we just need Apache, MySQL, PHP, phpMyAdmin. If you want you can go ahead and just select them and continue with installation clicking next. Windows Security Alert might ask for firewall permissions, check both private and public networks and click Allow Access. Once installation is done, click finish and XAMPP should run automatically. Pick your language and you are ready to go.

XAMPP Control Panel:

Once installed and ran, XAMPP control panel looks like:


Start 'Apache' and 'MySQL' and we are ready to write our very first PHP script and run it.

NOTE: if you get the following error when trying to start Apache:

Port 80 in use by "c:\program files (x86)\skype\phone\skype.exe"!

it's because SKYPE uses the same port that Apache tries to use. For now just close SKYPE and start Apache, a guide to fix that will be posted soon!

Once you start Apache and MySQL, open your browser and type in the URL 'localhost' and click go. If you followed the steps so far, you should see the 'XAMPP Welcome Page'. If you didn't, please post in the comments section if you had any problems or errors. I will try my best to reach to every single question.

Now back to the matter at hand, running our very first PHP script. In order for Apache to run PHP scripts, the script must be in the root directory of the web. In our case, its in the following directory:

C:\xampp\htdocs

NOTE: if you changed the installation directory during your installation, it will be 
youInstalledDirectory\htdocs

Now open up a text editor, basically any text editor works including windows notepad, but if you are planing to bigger scale app's, I would recommend you to use Sublime Text. Paste the following code in the text editor and save the file as 'hello.php'.

<?php echo "Hello PHP";  ?>

save it in the apache web dir C:\xampp\htdocs . Congratulations!  you just wrote your very first PHP script.

Now browse over to localhost/hello.php and you should see your script print out "Hello PHP" for you.

In the next part of the tutorial, we will make a small app which would further take us into the MySQL part. If you have any questions so far, please post it in the comments section.


Continue Reading...

Sunday, November 23, 2014

Java: Color Image To Grayscale


The following source code is an illustration of how to convert a color image to grayscale (black & white). This example shows usage of IO for images, file operations and RGB colors in java.

 1
 2
 3
 4
 5
 6
 7
 8
 9
10
11
12
13
14
15
16
17
18
19
20
21
22
23
24
25
26
27
28
29
30
31
32
33
34
35
36
37
38
39
40
41
42
43
44
45
46
47
48
49
50
51
52
53
package imageColor;

import java.awt.image.BufferedImage;
import java.awt.image.RenderedImage;
import java.io.File;
import java.io.IOException;

import javax.imageio.ImageIO;

public class test {
 public static void main(String[] args){
  BufferedImage image = null;
  try{
   image = ImageIO.read(new File("File Location"));
  } catch(Exception e){
   System.out.println(e);
  }
  
  convertToGrayscale(image);
  RenderedImage im = image;
  
  try{
   ImageIO.write(im, "jpg", new File("save location"));
  } catch (IOException e){
   System.out.println(e);
  }
  
 }
 private static void convertToGrayscale(final BufferedImage image){
     for(int i=0; i<image.getWidth(); i++){
         for(int j=0; j<image.getHeight(); j++){
             int color = image.getRGB(i,j);
  
             int alpha = (color >> 24) & 255;
             int red = (color >> 16) & 255;
             int green = (color >> 8) & 255;
             int blue = (color) & 255;
  
             final int lum = (int)(0.2126 * red + 0.7152 * green + 0.0722 * blue);
  
             alpha = (alpha << 24);
             red = (lum << 16);
             green = (lum << 8);
             blue = lum;
  
             color = alpha + red + green + blue;
  
             image.setRGB(i,j,color);
         }
     }
 }

}
Continue Reading...

Blogroll

About