
Now that we have run and tested Apache and PHP, the next step is running MySQL and creating a database and table which will hold information for our address book program. Through the XAMPP control panel start up Apache and MySQL. Then navigate to localhost/phpmyadmin and you shall see the phpMyAdmin interface.
- Creating the database: The first step with phpMyAdmin running is creating a new database. To do this, click on databases from the menu, point to the textbox labelled Create new database and type addressBook as the name of a new database. Click create. Next you will be prompted to create a new table, go ahead and create the table friends with 3 columns having the following stucture:


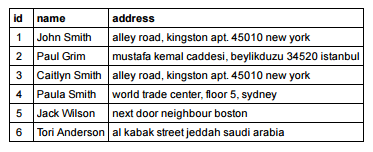
- Inserting new records: Following the creation of the friends table, you will be required to insert the columns that make up your table. You can either use phpMyAdmin's Insert interface which is easy or just use normal SQL queries. Here are some random inserted values that I am gonna use for this tutorial:
- Writing the PHP script: We are now ready to write the PHP program that will connect to the database and display our data in an internet browser. The procedure that we will write this program is to first establish a connection with the database using PHP, then start our XHTML deceleration and meta data, and finally in the body of our page, write a loop that will iterate through each record in the colleague table and display that data in the browser. Here's the PHP script, save it as index.php in a folder named addressBook:
<!DOCTYPE html PUBLIC "-//W3C//DTD XHTML 1.0 Transitional//EN" "http://www.w3.org/TR/xhtml1/DTD/xhtml1-transitional.dtd">
<html xmlns="http://www.w3.org/1999/xhtml">
 <head>
  <title>Address Book - Krypto Tek XAMPP Example</title>
 </head>
 <body>
 <?php
  //setting db details:
  $servername = "localhost";
  $username = "root";
  $password = "";
  $dbname = "addressBook";
  //establish a connection:
  $connection = new mysqli($servername, $username, $password, $dbname);
  //run a query and store results in variable $result:
  $result = $connection->query("SELECT * FROM friends");
 ?>
  <!-- We will make a table and display the values from our database in it-->
  <table border="1" cellpadding="2" cellspacing="3">
   <tr>
    <th>ID</th>
    <th>Name Surname</th>
    <th>Address</th>
   </tr>
   <?php
    //check if our query returned any values:
    if($result->num_rows > 0)
    {
     //loop through all the values fetched from $result and print them out as table rows:
     while($row = $result->fetch_assoc())
     {
      echo "<tr>";
      echo "<td>".$row['id']."</td>";
      echo "<td>".$row['name']."</td>";
      echo "<td>".$row['address']."</td>";
      echo "</tr>";
     }
    }
   ?>
  </table>
 </body>
</html>
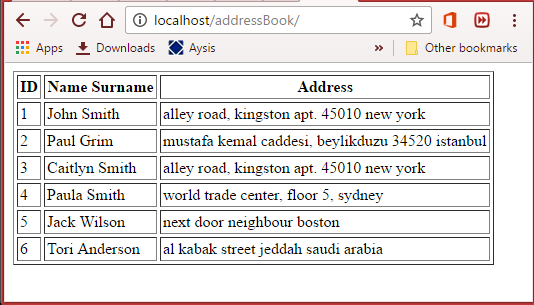
- Checking the results: Making sure that the Apache, along with MySQL are running, open up an instance of your internet browser and type in the location of your address book PHP file. For example, if you created an addressBook folder inside the htdocs folder, then the path to run the address book program would be: http://localhost/addressBook/index.php. If done correctly, you will be presented with a page similar to the following:
No comments:
Post a Comment